NGINX - THE MOST BELOVED WEB SERVER
Hello geeks! In this blog we will walk through the installation process of the NGINX server for machines running on Ubuntu 20.04 and we will try to make our website go live and running right away following some simple steps. But before technical stuff, let’s first start with some basic understanding of what NGINX or Apache Server is.
Nginx and Apache are the two most common open source web servers in the world. At present over 50% of all internet traffic is served by these servers all together. Both options can manage a variety of workloads and collaborate with other programmes to build a full web stack. In this blog we will only learn about NGINX. In our upcoming blogs we will be learning more about Apache.
Let’s Begin…
What is N G I N X – I N T R O D U C T I O N
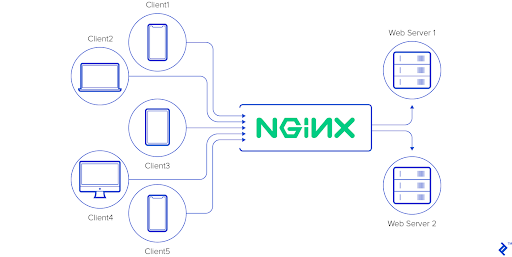
Nginx is a web server that also functions as a load balancer, reverse proxy, mail proxy, and HTTP cache. Igor Sysoev built this fantastic server, which was made available to the public in 2004. Nginx is free and open-source software distributed under the conditions of the 2-clause BSD license.
Some of the biggest and busiest websites on the internet are hosted by Nginx, one of the most well-liked web servers in the world. Being both a web server and a reverse proxy, it is a lightweight option.
We’ll go over installing Nginx on your Ubuntu 20.04 server, configuring the firewall, managing the Nginx process, and configuring server blocks for hosting many domains from a single server in this article.
Let’s jump to the technical part…
Step #1 : Installing Nginx
Nginx may be installed using the apt packaging system because it is present in Ubuntu’s default repositories.
We will update our local package index so that we have access to the most recent package listings because this is our first encounter with the apt packaging system in this session. After that, we can set up nginx:
sudo apt update
sudo apt install nginx
Nginx and all necessary dependencies will be installed to your server by apt after you approve the procedure.
Step #2 : Changing the Firewall
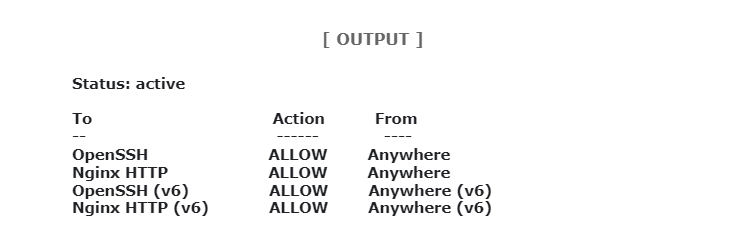
The firewall programme must be changed to permit access to the service before Nginx testing. After installation, Nginx registers with ufw as a service, making granting access to Nginx simple.
Type the following to see a list of the settings that ufw can work with for applications: sudo ufw app list
[ OUTPUT ]
Available applications:
Nginx Full
Nginx HTTP
Nginx HTTPS
OpenSSH
The result shows that Nginx supports the following three profiles:
- Full Nginx: Both port 80 (for regular, unencrypted web traffic) and port 443 (for TLS/SSL-encrypted traffic) are opened by this profile
- HTTP Nginx: Only port 80 is opened by this profile (normal, unencrypted web traffic)
- Nginx HTTPS: This profile only allows traffic on port 443 that is SSL/TLS encrypted.
It is advised that you activate the most stringent profile that still permits the preset traffic. We simply need to let port 80 traffic for the time being.
You may activate this by keying in:
You can enable this by typing:
sudo ufw allow ‘Nginx HTTP’
You can verify the change by typing:
sudo ufw app list
The output will indicated which HTTP traffic is allowed:
Step #3 - Checking your Web Server
After the installation is complete, Ubuntu 20.04 launches Nginx. The web server ought to be operational by now.
By typing systemctl status nginx we can verify that the service is active with the systemd init system.
[ OUTPUT ]
nginx.service – A high performance web server and a reverse proxy server
Loaded: loaded (/lib/systemd/system/nginx.service; enabled; vendor preset: enabled)
Active: active (running) since Fri 2020-04-20 16:08:19 UTC; 3 days ago
Docs: man:nginx(8)
Main PID: 2369 (nginx)
Tasks: 2 (limit: 1153)
Memory: 3.5M
CGroup: /system.slice/nginx.service
├─2369 nginx: master process /usr/sbin/nginx -g daemon on; master_process on;
└─2380 nginx: worker process
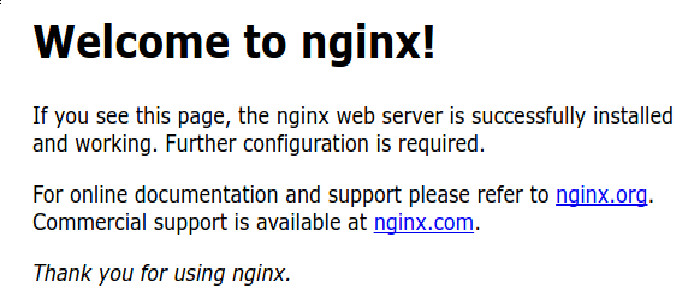
By going to your server’s IP address, you may visit the default Nginx landing page to verify that the programme is functioning as intended.
Now type your server’s IP it into the address bar of your browser like follows:
http://your_server_ip
You ought to see the standard Nginx landing page:
Step #4 : Managing the Nginx Process
Now that your web server is operational, let’s go through some fundamental administrative commands.
- Type sudo systemctl stop nginx to terminate your web server.
- When the web server is halted, type systemctl start nginx sudo to restart it.
- Type sudo systemctl restart nginx to halt the service, then restart itself.
- Nginx can often reload without disconnecting connections if you are simply making configuration changes. To do this, type sudo systemctl reload nginx
- Nginx is set up by default to launch immediately when the server boots. You can stop this behaviour if it’s not what you want by typing sudo systemctl disable nginx
- You can type sudo systemctl enable nginx to enable the service to start up again at boot.
Great till now! You should be prepared to set up the website to host several domains now that you are familiar with the fundamental administration commands.
Step #5 : Setting up server blocks
Server blocks, which are akin to virtual hosts in Apache, may be used with the Nginx web server to encapsulate configuration information and host several domains from a single server. Your domain will be the domain name we create; however, you should substitute your own domain name here.
On Ubuntu 20.04, Nginx has one server block enabled by default that is set up to serve files from the /var/www/html directory. While this is effective for a single site, hosting many sites might make it cumbersome. Instead of making changes to /var/www/html, let’s build a directory structure within /var/www for our domain site and leave /var/www/html in place to act as the default directory if a client request doesn’t match any other sites.
Use the -p parameter to establish any required parent directories when creating the directory for your domain:
sudo mkdir -p /var/www/your domain/html
Next, use the $USER environment variable to specify who owns the directory:
sudo chown -R $USER:$USER /var/www/your domain/html
If you haven’t changed the umask value, which determines the default file permissions, the permissions of your web roots should be accurate. You may enter the following command to verify that your permissions are valid and provide the owner read, write, and execute access to the files while only providing groups and other users read and execute access:
sudo chmod -R 755 /var/www/your domain
Next, using nano or your preferred editor, make a sample index.html page as follows:
sudo nano /var/www/your domain/html/index.html
Add the following example HTML inside:
/var/www/your domain/html/index.html
<html>
<head>
<title>NGINX Tutorial</title>
</head>
<body>
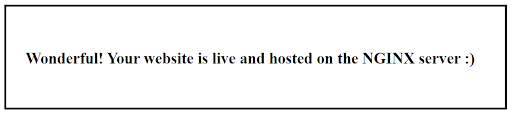
<h2>Wonderful! Your website is live and hosted on the NGINX server :)</h2>
</body>
When prompted to save, type Y and then press Enter. This will save and shut the document.
Create a server block with the appropriate directives so that Nginx may deliver this content. Let’s create a new configuration file at /etc/nginx/sites-available/your domain rather than just altering the default one:
sudo nano /etc/nginx/sites-available/your domain.
The configuration block below should be pasted in; it is identical to the default but adjusted for our new directory and domain name:
server {
listen 80;
listen [::]:80;
root /var/www/your_domain/html;
index index.html index.htm index.nginx-debian.html;
server_name your_domain www.your_domain;
location / {
try_files $uri $uri/ =404;
}
}
You’ll see that we changed the server name to our domain name and the root configuration to point to our new directory.
Now that the file has been enabled, let’s link to the sites-enabled directory, which Nginx reads from when it starts up:
sudo ln -s /etc/nginx/sites-available/your_domain /etc/nginx/sites-enabled/
It should be noted that Nginx employs symbolic links, also known as symlinks, to keep track of which of your server blocks are active. Making a symlink is similar to making a shortcut on your computer’s hard drive, allowing you to retain the server block in the sites-available directory and erase the shortcut from the sites-enabled directory at a later time if you decide to enable it.
You can learn more about how Nginx interprets these directives here. Two server blocks are now activated and set up to react to requests depending on their listen and server name directives:
Responses to queries for both your domain and www.your domain are provided by your domain.
By default, all requests on port 80 that do not match the other two blocks will be reacted to.
It is important to change a single variable in the /etc/nginx/nginx.conf file in order to prevent a potential hash bucket memory issue that may result from adding extra server names. Open the document:
Do a sudo nano on /etc/nginx/nginx.conf
Find the server_names_hash_bucket_size directive and remove the # symbol to uncomment the line. If you are using nano, you can quickly search for words in the file by pressing CTRL and w.
http {
…
server_names_hash_bucket_size 64;
…
}
When you’re done, save and close the file.
Next, check all of your Nginx files to ensure there are no syntax errors:
sudo nginx -t
Restart Nginx to apply your modifications if there are no issues:
sudo systemctl restart nginx
Your domain name should now be served by Nginx. You may verify this by going to http://your domain, where you ought to see the following:
Step #6 - Learning Important Nginx Files and Directories
After learning how to control the Nginx server, you should spend some time getting acquainted with a few crucial folders and files.
Content
/var/www/html: The real web content is delivered from the /var/www/html directory, which by default simply contains the default Nginx page you previously viewed. By making changes to the Nginx configuration files, this may be adjusted.
Configuring the server
- The location for Nginx configuration is /etc/nginx. Here are all of the Nginx configuration files.
- The primary Nginx configuration file is located in /etc/nginx/nginx.conf. To alter the overall settings of Nginx, modify this.
- The directory where per-site server blocks can be kept is /etc/nginx/sites-available/. The configuration files in this directory must be linked to the sites-enabled directory in order for Nginx to use them. All server block configuration is typically completed in this directory, which is then linked to the other directory to allow it.
- The directory where enabled per-site server blocks are kept is located at /etc/nginx/sites-enabled/. Links to configuration files located in the sites-available directory are often used to build these.
- The directory /etc/nginx/snippets has configuration pieces that can be used elsewhere in the Nginx setup. Creating snippets from potentially repetitive setup portions is a smart idea.
Server Logs
/var/log/nginx/access.log: Every request to your web server is recorded in this log file unless Nginx is configured to do otherwise.
/var/log/nginx/error.log: Any Nginx errors will be recorded in this log.
Conclusion
After setting up your web server, you have a variety of options for the material you want to provide and the technologies you want to employ to give users a richer experience. You can also secure your Linux NGINX Server.