

DevOps ,
Adding CNAME Record on Root Domain (zone apex) in Route 53
Posted On: January 2, 2023 | min read
Posted On: January 2, 2023 | min read
The following blog address the limitation of Route 53 to add CNAME record on the root domain (zone apex) with which the Hosted Zone is been created.
For legitimate reasons CNAME records are illegal for domains that are not sub-domain.
There are mainly 2 reasons:
In today’s landscape there are many web-hosting sites that provides us with subdomains instead on A records on hosting a site on their platform’s server. This may cause trouble when you are managing the domain (that you want to point to the platform’s server) on Route 53. It is a common practice to host the landing page of a website (which is generally the root domain) on a web designing PAAS solution provider.
To get around this problem we will be using the concept of:
What is an ALIAS record in Route 53?
It is a virtual record types that provide CNAME like behavior, with none of the downsides. Alias records let you route traffic to selected AWS resources, such as Load balancer, CloudFront.
Unlike a CNAME record, you can create an alias record at the top node of a DNS namespace, also known as the zone apex. For example, if you register the DNS name example.com, the zone apex is example.com. You can’t create a CNAME record for example.com, but you can create an alias record for example.com that routes traffic to www.example.com.
Note: – ALIAS records can only be applied to AWS resources.
An Application Load Balancer (ALB) functions at the application layer, the seventh layer of the Open Systems Interconnection (OSI) model. After the load balancer receives a request, it evaluates the listener rules in priority order to determine the path in which traffic will be routed.
Now, let’s start with the setup:
Assumption: –
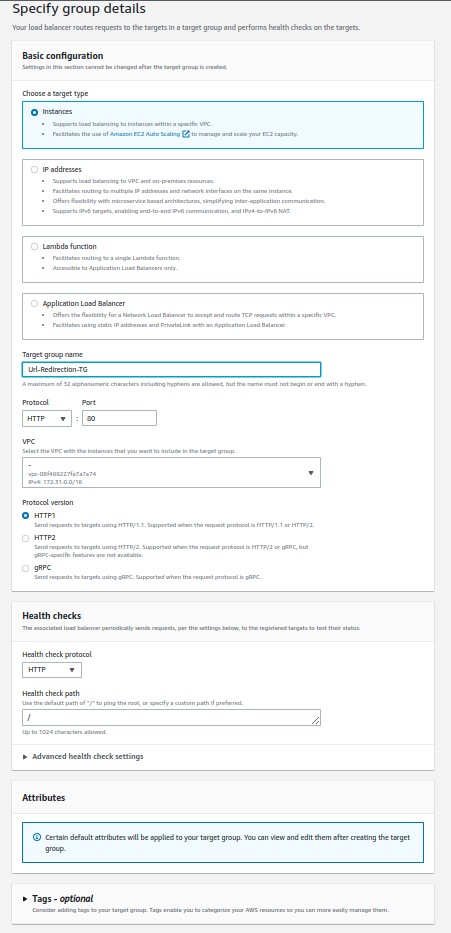
Creating a Target group:
Funnily, this target group will be unnecessary after the setup is complete and we can delete it, but AWS doesn’t support creating ALB without target groups.
Steps:
a) Go to EC2 console -> Target group
b) Create a Target group with default settings given. Do not attach any targets to the target group
c) Note the VPC where the target group you are creating. This is where ALB will also be created.
Note: – IT is advisable to select a VPC where there is multiple public subnets in different availability zones.
d) Give a name for the target group.
Creating Application Load Balancer:
Steps:
a) Go to EC2 console -> Load balancer
b) Select Create Load balancer -> Application Load balancer
c) Select the scheme as Internet-facing.
d) Select the same VPC where the Target group was created.
e) Choose 1 public subnets from each availability zone.
f) Create/select a security group.
I) Inbound Rule: Port 80 & 443 should be open to 0.0.0.0/0 (all)
II) Outbound Rule: All ports should be open to 0.0.0.0/0 (all)

g) Select the Listener protocol & port as HTTPS & 443. Select the Target group created above as ’Forward default action’.
h) Select the SSL certificate you created from ACM.
i) Create the Load balancer with a unique name.
Steps:
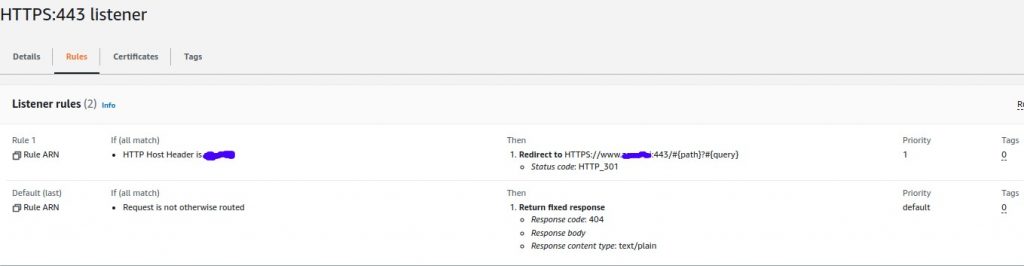
a) Select the listener HTTPS:443.
b) Edit the default action from the details page
i) Remove the default action from listener details. Create a new action with Action type: ‘Return fixed response’.
ii) Enter response code as 404. Optionally you can add response body.
* The reason is, if anyone tries to open the URL of the load balancer directly, the response will be 404 Not found. The ALB can only forward traffic when it is redirected from the root domain URL through the ALIAS record.
c) In the same listener under Rules, select manage rules
i) Select add rules (shown by + sign on top)
ii) Add IF condition as ‘Host Header’. The value is the name of the root domain from which you want to redirect.
iii) Under Add action select: ‘Redirect to’.
iv) Select the redirect protocol as HTTPS with ‘Custom host, path, query’.
v) For Host, enter www.{root_domain}. For example, if your root domain is example.com, the Host will be ‘www.example.com’.
* The way it works, the root domain redirects to asubdomain of its, for which CNAME record can be added.Generally, that subdomain is ‘www’. In the later phase wehave to update a CNAME record on Route 53 for thissubdomain (www.example.com, as ex here).
* Note the ‘Host value’ you added as we have to create aCNAME record for this value in Route 53. This subdomainrecord will point to the URL provided to us by the web-hosting site.
Creating Listener HTTP: 80:
Steps:
a) Under the listener tab in the Load balancer main page, select ‘Add Listener’
b) Select the Protocol as HTTP:80. Under ‘default Action’ select ‘Redirect’.
c) Under ‘Redirect’ select Protocol HTTPS:443.
d) For redirection rule, select: ‘Original, host, path, query’. Save the setting.
* The reason is, if the URL is requested with HTTP protocol it will auto-redirect to HTTPS..

We need to add 2 records in route 53:
* Adding the ALB ALIAS record to the root domain.
* Adding CNAME record to the subdomain that redirects to the URL provided to us from the web hosting provider
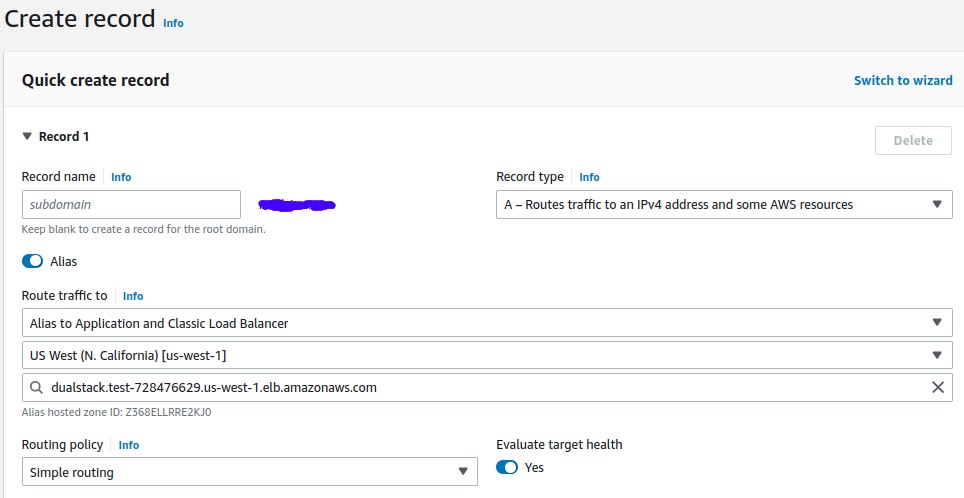
Create record under the Hosted zone: –
The 1st record is for ALIAS:
Steps:
a) Since the record will be on root domain, we keep subdomain value as blank.
b) Select the Record type as A record. TURN ON ALIAS radio icon.
c) Select ‘Route traffic to’ as ‘Alias to Application & classic load balancer’.
d) Select the proper region and the ALB DNS name of the Load balancer you created for this project.
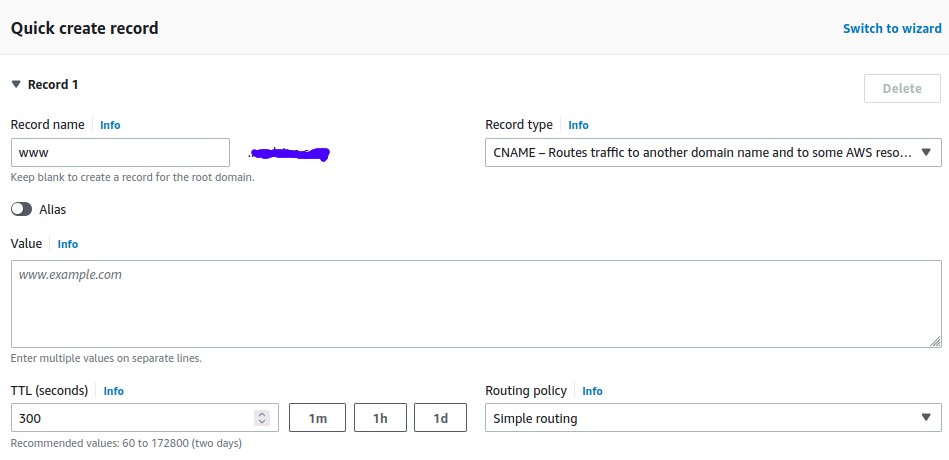
The 2nd record is for CNAME:
Steps:
a) Enter the subdomain value, the Host value you used when creating the ALB HTTPS listener custom rule.
* The reason is, the load balancer will redirect to this CNAME record and this CNAME record will finally redirect to the URL that is used on web-hosting.
b) Select the Record type as CNAME record.
c) Finally, put the URL provided by the web-hosting provider as value.
Redirection Flow through Route 53
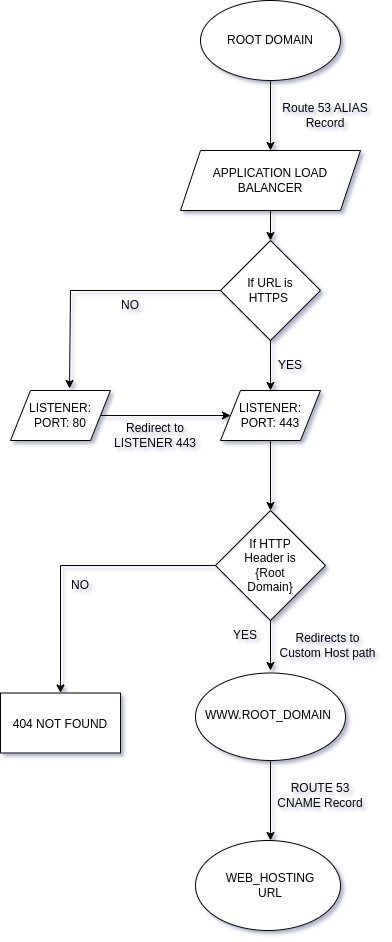
In conclusion, through Application Load balancer we can forward the domain root to a CNAME record.


April 11, 2023
Admin wrote
July 8, 2022
Admin wrote

Subscribe to our newsletter